Learn how to create an MCP server by building a CRM

Introduction to MCP
In this post, we’re going to write an MCP server.
We’ll use this to build a foundational understanding of the Model Context Protocol. With this foundational understanding of the MCP server’s architecture, we can now explore the specific capabilities and workflows that this system supports, and how the different components interact to deliver a seamless conversational experience.
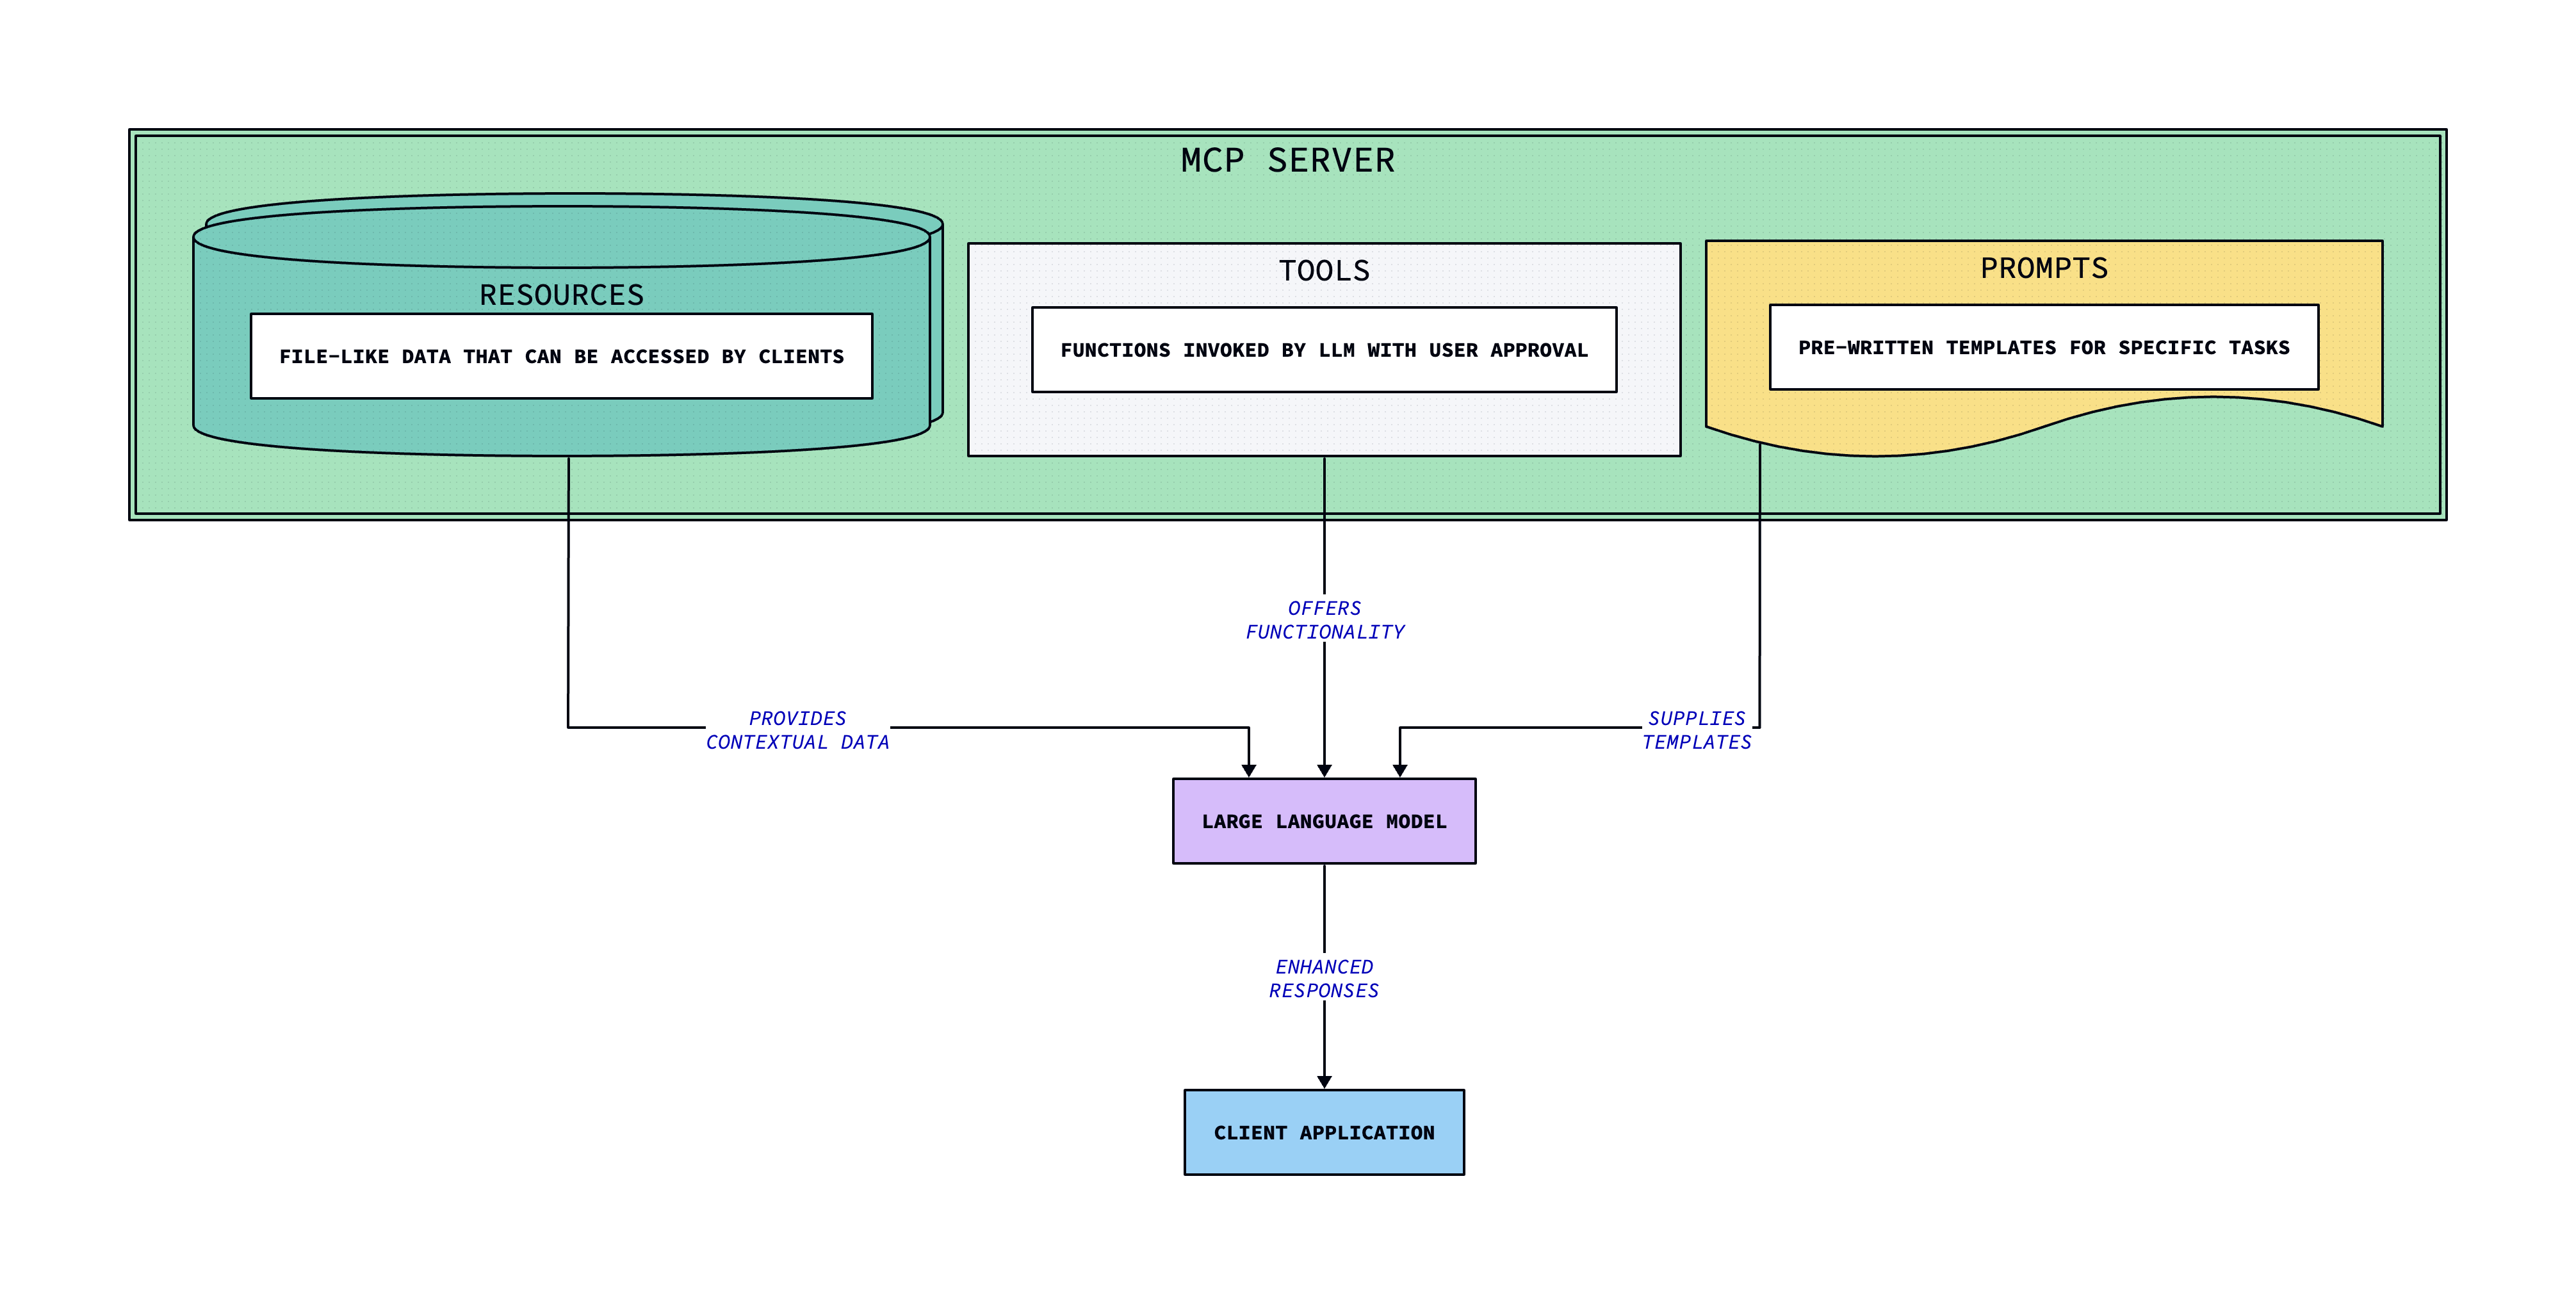
This architectural diagram provides an overview of the MCP (Model Context Protocol) server, highlighting its key components and how they interact. Understanding this high-level architecture is crucial as we explore the implementation details of this conversational AI system.
Some background on MCP
MCP servers can offer three primary types of capabilities:
- Resources: These are file-like data that can be accessed by clients, such as API responses or file contents.
- Tools: Functions that can be invoked by the LLM, contingent upon user approval, allowing for dynamic interactions.
- Prompts: Pre-written templates that assist users in accomplishing specific tasks efficiently.
By leveraging MCP, we can create a simple Customer Relationship Management (CRM) system that not only helps maintain relationships with friends and industry contacts but also serves as a practical learning experience for understanding the Model Context Protocol. This CRM will enable users to manage their contacts effectively, providing a hands-on approach to exploring the capabilities of MCP.
Purpose of the CRM
The primary goal of creating this simple CRM is to facilitate the management of relationships with friends and industry contacts. In today’s fast-paced world, maintaining these connections can be challenging, and having a dedicated tool can significantly enhance our ability to keep track of important interactions, notes, and tags associated with each contact.
By building this CRM, we aim to achieve several benefits:
-
Enhanced Relationship Management: The CRM allows users to store and organize contact information, making it easier to remember important details about friends and colleagues. This can lead to more meaningful interactions and stronger relationships.
-
Learning Experience: Developing this CRM serves as a hands-on project to understand the Model Context Protocol (MCP). Users will gain insights into how MCP can be utilized to connect AI models with data sources, thereby simplifying the integration process.
-
Practical Application of MCP: The CRM demonstrates the capabilities of MCP by providing tools for adding, searching, and managing contacts. This practical application helps users see the real-world benefits of using a standardized protocol for AI applications.
This architectural diagram illustrates the integration and communication model for three distinct applications. It highlights the different integration approaches, standardized connections, and the underlying Model Context Protocol that serves as a unifying layer. Understanding this high-level architecture is crucial for comprehending the overall system design and how the applications interact with each other.
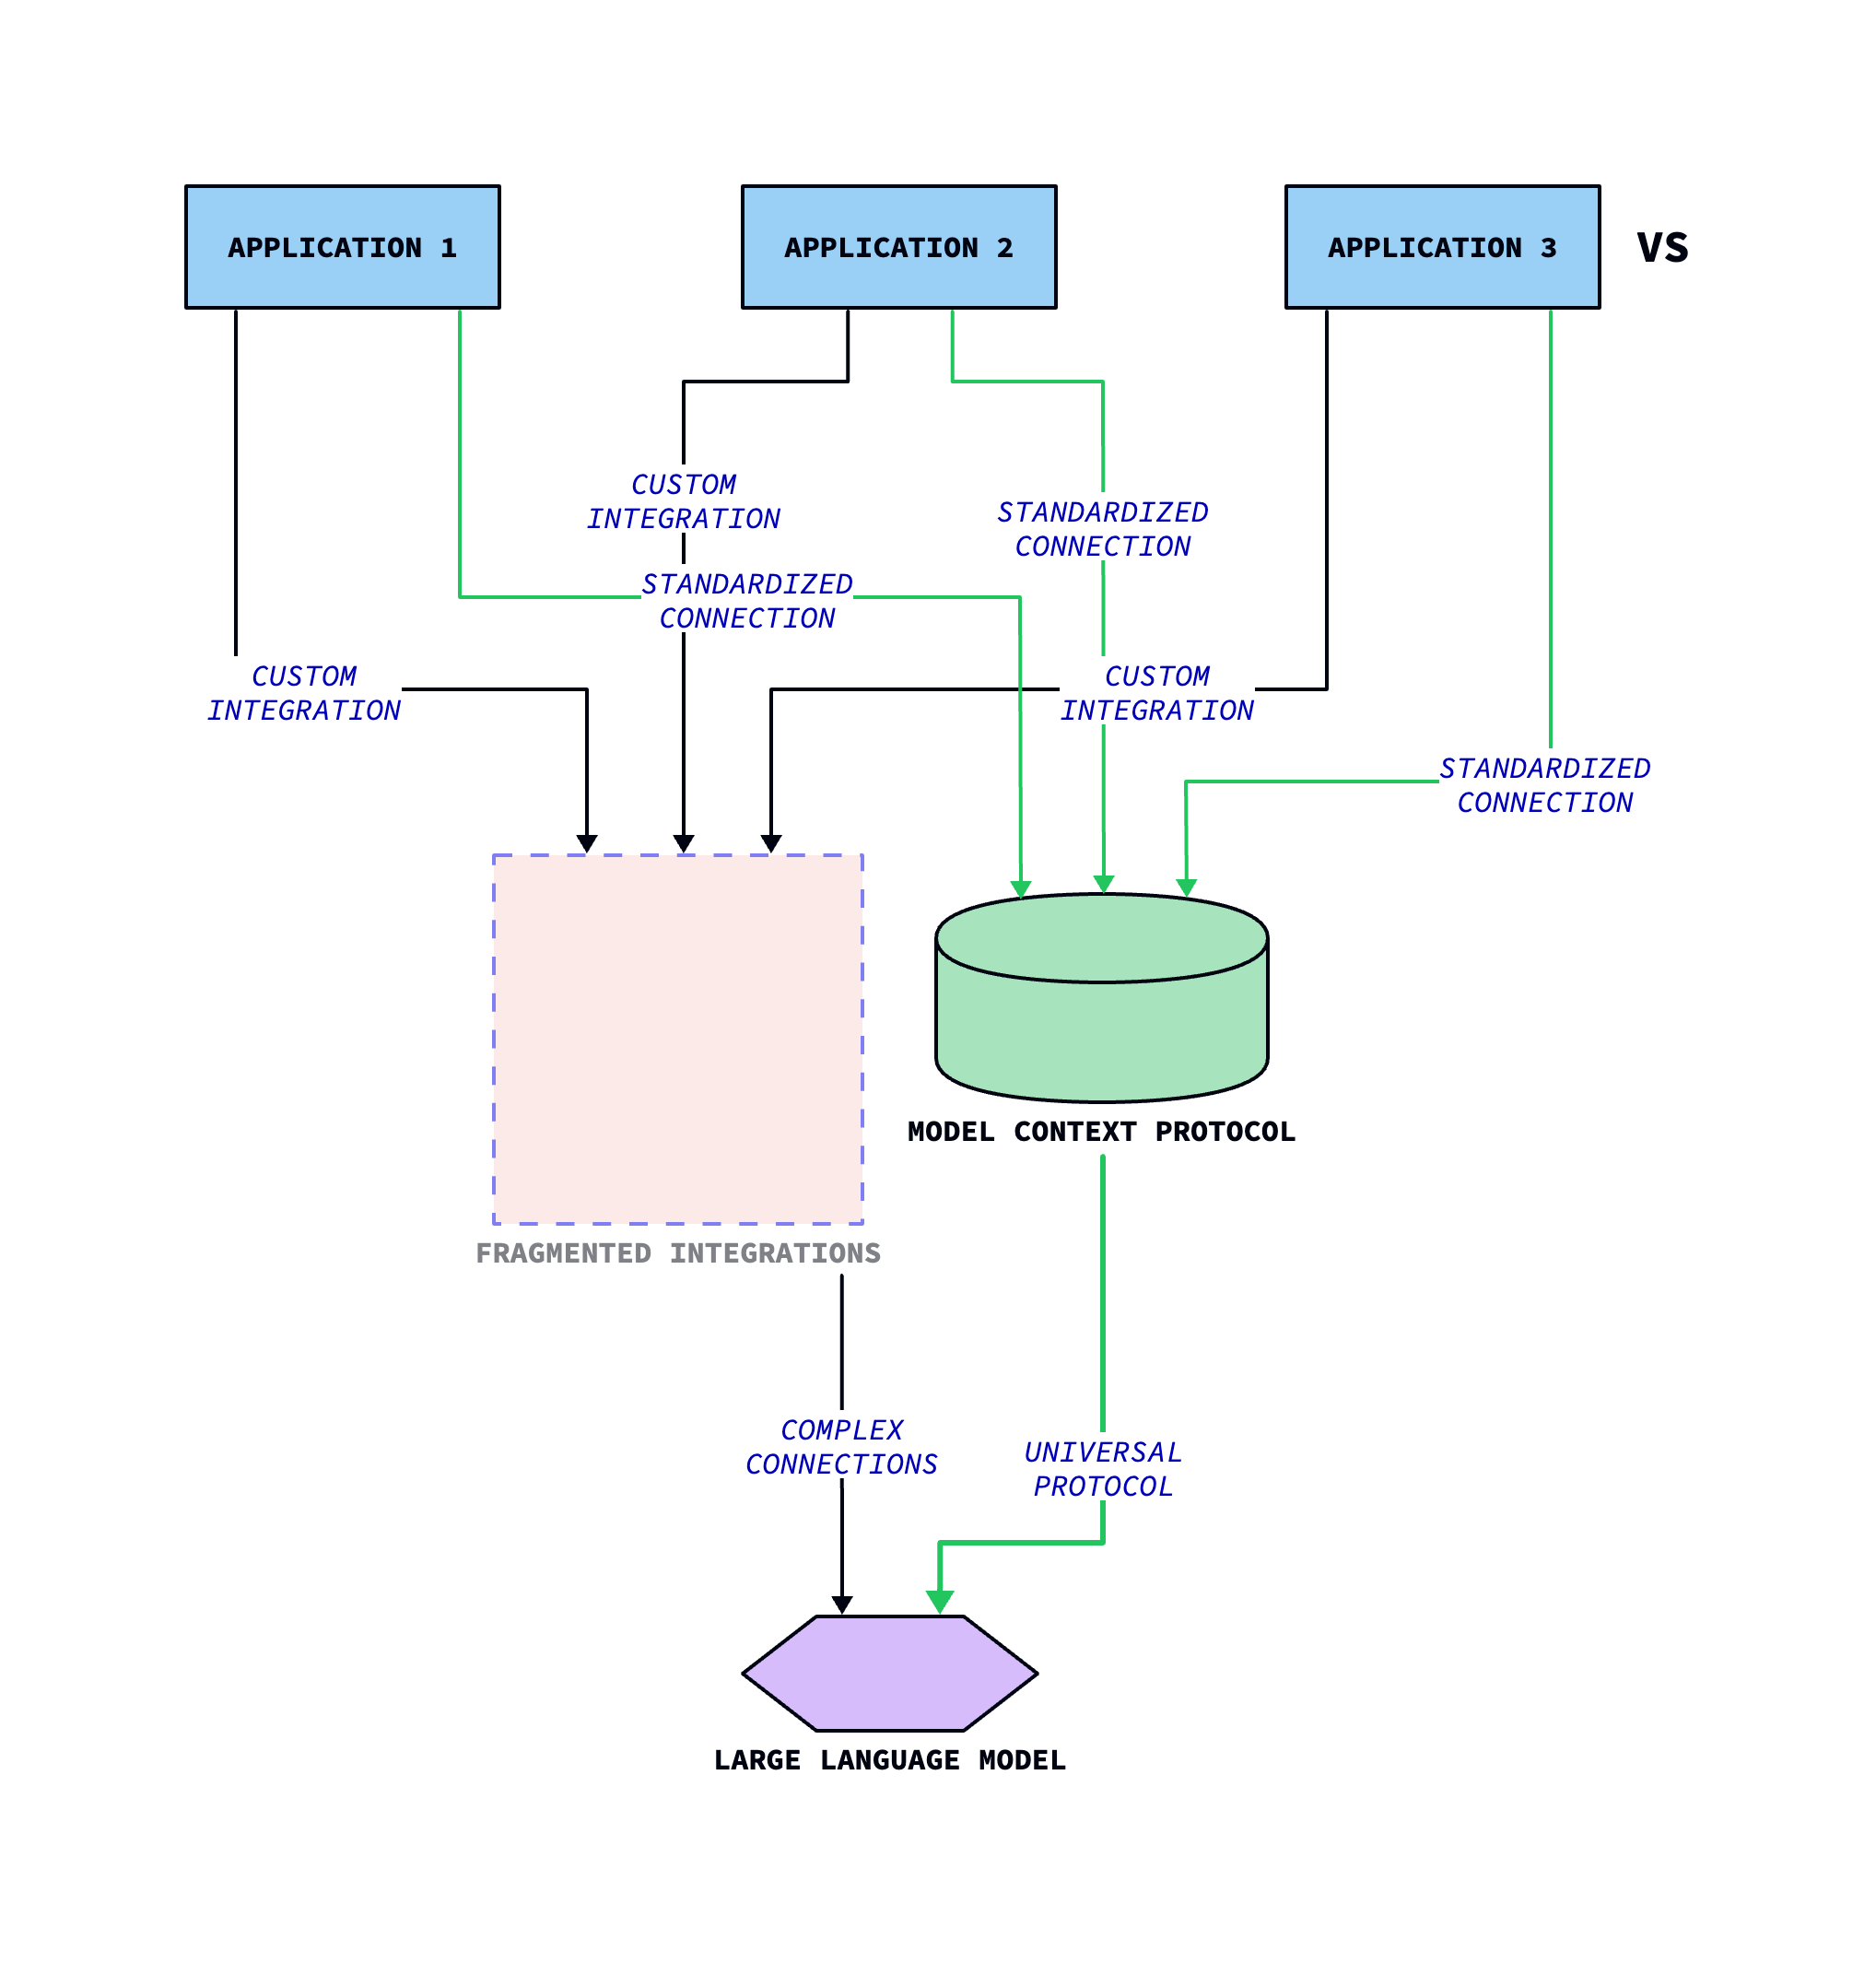
With this overview of the application integration architecture, we can now dive deeper into the specific implementation details and configuration requirements for each component. This will provide a solid foundation for the subsequent steps in the development process.
To set up the FastMCP server, we first need to initialize it with a name that identifies our CRM application. The following code snippet demonstrates how to do this:
import sqlite3
from mcp.server.fastmcp import FastMCP

# Initialize FastMCP server and give it a name
mcp = FastMCP("personal_crm")
This image provides a detailed overview of the architecture and components of the MCP (Model Context Protocol) server. It highlights the key elements that work together to deliver functionality to client applications, making it an essential reference for understanding the system’s design and capabilities.
With this comprehensive visual representation, you now have a solid understanding of the MCP server’s architecture and the key elements that work together to deliver a powerful collaborative platform. Let’s move on to exploring the specific features and use cases of this system.
After the server is initialized, we can proceed to define various tools and functionalities that will allow us to interact with our CRM data effectively. The FastMCP server provides a standardized way to connect our application with AI models, enabling us to leverage the capabilities of the Model Context Protocol (MCP) for enhanced data management and interaction.
This architectural diagram provides a high-level overview of the system design for a Customer Relationship Management (CRM) application that uses a FastMCP server and a SQLite database. It illustrates the key components and their interactions, giving us a clear understanding of the system’s structure and functionality.

With this comprehensive view of the system’s architecture, we can now dive deeper into the implementation details and explore how each component contributes to the overall CRM solution.
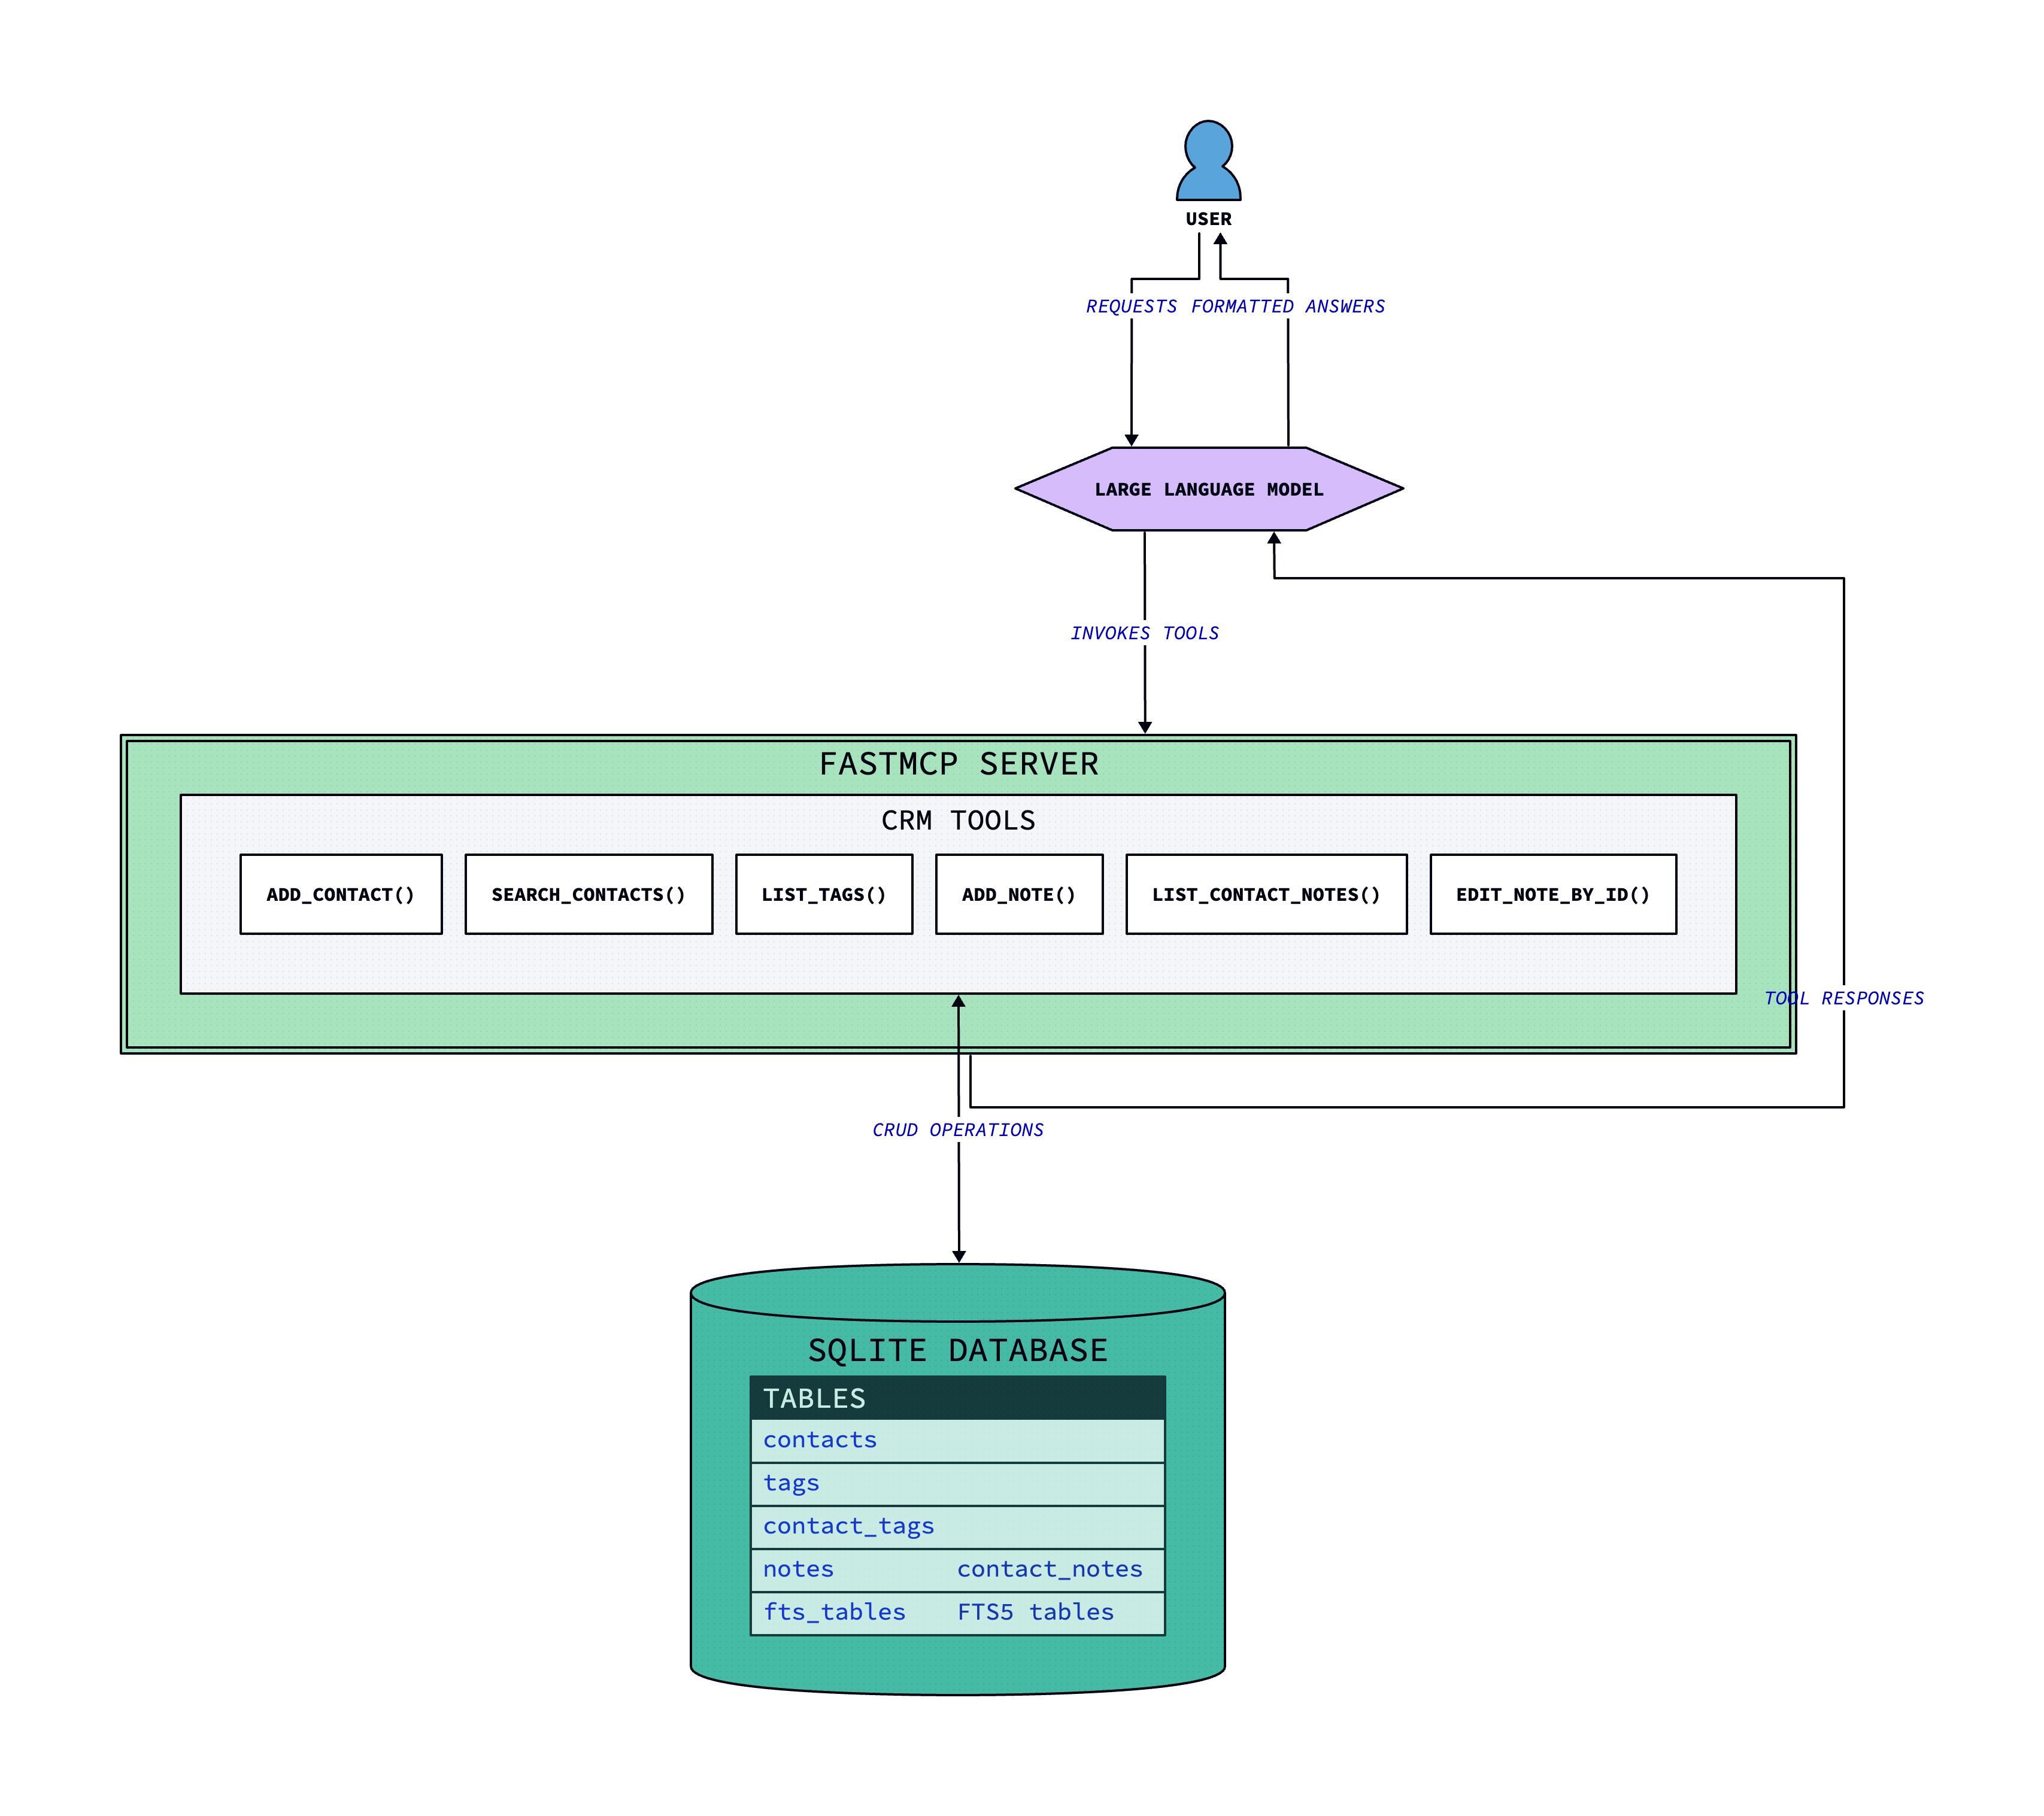
With this architectural overview in mind, we can now dive deeper into the specific features and capabilities of the CRM system and how the different components work together to deliver an effective customer relationship management solution.
To effectively manage contacts, tags, and notes within our CRM, we need a well-structured SQLite database. The database will consist of several tables, each serving a specific purpose:
-
Contacts Table: This table will store the basic information about each contact, including a unique ID, the contact’s name, and the timestamp of when the contact was created.
-
Tags Table: This table will hold unique tags that can be associated with contacts, allowing for better organization and categorization.
-
Contact_Tags Table: This is a junction table that links contacts to tags, enabling many-to-many relationships between them.
-
Contact_Notes Table: This table will store notes related to each contact, including the note text and the timestamp of when the note was created.
-
FTS5 Tables: We will also create Full-Text Search (FTS5) tables to facilitate efficient searching of contacts and notes.
The following code initializes the database and creates the necessary tables: SQLite.
def init_db():
    conn = sqlite3.connect("personal_crm.db")
    c = conn.cursor()

    # Create contacts table
    c.execute("""
        CREATE TABLE IF NOT EXISTS contacts (
            id INTEGER PRIMARY KEY,
            name TEXT NOT NULL,
            created_at TIMESTAMP DEFAULT CURRENT_TIMESTAMP
        )
    """)

    # Create tags table
    c.execute("""
        CREATE TABLE IF NOT EXISTS tags (
            id INTEGER PRIMARY KEY,
            name TEXT NOT NULL UNIQUE
        )
    """)

    # Create contact_tags table
    c.execute("""
        CREATE TABLE IF NOT EXISTS contact_tags (
            contact_id INTEGER,
            tag_id INTEGER,
            FOREIGN KEY (contact_id) REFERENCES contacts (id),
            FOREIGN KEY (tag_id) REFERENCES tags (id),
            PRIMARY KEY (contact_id, tag_id)
        )
    """)

    # Create notes table
    c.execute("""
        CREATE TABLE IF NOT EXISTS contact_notes (
            id INTEGER PRIMARY KEY,
            contact_id INTEGER,
            note_text TEXT NOT NULL,
            created_at TIMESTAMP DEFAULT CURRENT_TIMESTAMP,
            FOREIGN KEY (contact_id) REFERENCES contacts (id)
        )
    """)

    # Create FTS5 tables for search
    c.execute("""
        CREATE VIRTUAL TABLE IF NOT EXISTS contacts_fts USING fts5(
            name,
            content='contacts',
            content_rowid='id'
        )
    """)

    c.execute("""
        CREATE VIRTUAL TABLE IF NOT EXISTS notes_fts USING fts5(
            note_text,
            content='contact_notes',
            content_rowid='id'
        )
    """)

    # Create triggers to keep FTS tables in sync
    c.execute("""
        CREATE TRIGGER IF NOT EXISTS contacts_ai AFTER INSERT ON contacts BEGIN
            INSERT INTO contacts_fts(rowid, name) VALUES (new.id, new.name);
        END;
    """)

    c.execute("""
        CREATE TRIGGER IF NOT EXISTS contacts_ad AFTER DELETE ON contacts BEGIN
            INSERT INTO contacts_fts(contacts_fts, rowid, name) VALUES('delete', old.id, old.name);
        END;
    """)

    c.execute("""
        CREATE TRIGGER IF NOT EXISTS contacts_au AFTER UPDATE ON contacts BEGIN
            INSERT INTO contacts_fts(contacts_fts, rowid, name) VALUES('delete', old.id, old.name);
            INSERT INTO contacts_fts(rowid, name) VALUES (new.id, new.name);
        END;
    """)

    c.execute("""
        CREATE TRIGGER IF NOT EXISTS notes_ai AFTER INSERT ON contact_notes BEGIN
            INSERT INTO notes_fts(rowid, note_text) VALUES (new.id, new.note_text);
        END;
    """)

    c.execute("""
        CREATE TRIGGER IF NOT EXISTS notes_ad AFTER DELETE ON contact_notes BEGIN
            INSERT INTO notes_fts(notes_fts, rowid, note_text) VALUES('delete', old.id, old.note_text);
        END;
    """)

    c.execute("""
        CREATE TRIGGER IF NOT EXISTS notes_au AFTER UPDATE ON contact_notes BEGIN
            INSERT INTO notes_fts(notes_fts, rowid, note_text) VALUES('delete', old.id, old.note_text);
            INSERT INTO notes_fts(rowid, note_text) VALUES (new.id, new.note_text);
        END;
    """)

    conn.commit()
    conn.close()
After running this code, the database will be set up with all required tables, allowing us to proceed with adding contacts, tags, and notes in the CRM.
To execute the initialization, simply call the init_db() function:
init_db()This will ensure that our database is ready for the CRM functionalities we will implement next.
In this section, we will implement the core functionalities of our CRM, which include adding contacts, searching for contacts, managing tags, and adding and managing notes.
Adding contacts
To add a new contact to the CRM, we will use the add_contact function. This function allows users to input the contact’s name, optional tags, and notes. The function handles the insertion of the contact into the database and manages the relationships with tags and notes.
Here is the code for the add_contact function:
@mcp.tool()
async def add_contact(name: str, tags: str = "", notes: str = "") -> str:
    """Add a new contact to the CRM.

    Args:
        name: Name of the contact
        tags: Comma-separated list of tags (optional)
        notes: Initial notes about the contact (optional)
    """
    conn = sqlite3.connect("personal_crm.db")
    c = conn.cursor()

    # Add contact
    c.execute("INSERT INTO contacts (name) VALUES (?)", (name,))
    contact_id = c.lastrowid

    # Add tags if provided
    if tags:
        tag_list = [t.strip() for t in tags.split(",")]
        for tag in tag_list:
            # Insert tag if it doesn't exist
            c.execute("INSERT OR IGNORE INTO tags (name) VALUES (?)", (tag,))
            c.execute("SELECT id FROM tags WHERE name = ?", (tag,))
            tag_id = c.fetchone()[0]
            # Link tag to contact
            c.execute(
                "INSERT INTO contact_tags (contact_id, tag_id) VALUES (?, ?)",
                (contact_id, tag_id),
            )

    # Add initial notes if provided
    if notes:
        c.execute(
            "INSERT INTO contact_notes (contact_id, note_text) VALUES (?, ?)",
            (contact_id, notes),
        )

    conn.commit()
    conn.close()

    return f"Contact {name} added successfully"
Searching contacts
The search_contacts function enables users to search for contacts by name, notes, or tags. It utilizes FTS5 for efficient searching with BM25 ranking, allowing for quick retrieval of relevant contacts based on the search query.
Here is the code for the search_contacts function:
@mcp.tool()
async def search_contacts(query: str = "", tags: str = "") -> str:
    """Search for contacts by name, notes, or tags using FTS5 with BM25 ranking.

    Args:
        query: Search term for name or notes (optional)
        tags: Comma-separated list of tags to filter by (optional)
    """
    conn = sqlite3.connect("personal_crm.db")
    c = conn.cursor()

    if query:
        base_query = """
            WITH ranked_contacts AS (
                SELECT c.id, c.name, bm25(contacts_fts) as name_rank
                FROM contacts_fts
                JOIN contacts c ON c.id = contacts_fts.rowid
                WHERE contacts_fts MATCH ?
                UNION
                SELECT c.id, c.name, bm25(notes_fts) as note_rank
                FROM notes_fts
                JOIN contact_notes cn ON cn.id = notes_fts.rowid
                JOIN contacts c ON c.id = cn.contact_id
                WHERE notes_fts MATCH ?
            )
            SELECT DISTINCT
                rc.name,
                GROUP_CONCAT(DISTINCT t.name) as tags,
                GROUP_CONCAT(DISTINCT cn.note_text) as notes
            FROM ranked_contacts rc
            LEFT JOIN contact_tags ct ON rc.id = ct.contact_id
            LEFT JOIN tags t ON ct.tag_id = t.id
            LEFT JOIN contact_notes cn ON rc.id = cn.contact_id
        """
        params = [query, query]
    else:
        base_query = """
            SELECT DISTINCT
                c.name,
                GROUP_CONCAT(DISTINCT t.name) as tags,
                GROUP_CONCAT(DISTINCT cn.note_text) as notes
            FROM contacts c
            LEFT JOIN contact_tags ct ON c.id = ct.contact_id
            LEFT JOIN tags t ON ct.tag_id = t.id
            LEFT JOIN contact_notes cn ON c.id = cn.contact_id
        """
        params = []

    if tags:
        tag_list = [t.strip() for t in tags.split(",")]
        placeholders = ",".join(["?" for _ in tag_list])
        tag_condition = f"""
            c.id IN (
                SELECT contact_id
                FROM contact_tags ct
                JOIN tags t ON ct.tag_id = t.id
                WHERE t.name IN ({placeholders})
            )
        """
        if query:
            base_query += " WHERE " + tag_condition
        else:
            base_query += " WHERE " + tag_condition
        params.extend(tag_list)

    base_query += " GROUP BY " + ("rc.id" if query else "c.id")

    if query:
        base_query += " ORDER BY name_rank"

    c.execute(base_query, params)
    results = c.fetchall()
    conn.close()

    if not results:
        return "No contacts found"

    contacts = "\n\n".join(
        [
            f"Name: {row[0]}\nTags: {row[1] or 'None'}\nNotes: {row[2] or 'None'}"
            for row in results
        ]
    )

    return f"Found contacts:\n\n{contacts}"
Managing tags
Tags (or categories) help organize contacts within the CRM. The list_tags function retrieves all existing tags in the system, along with their usage counts, allowing users to see how many contacts are associated with each tag.
Here is the code for the list_tags function:
@mcp.tool()
async def list_tags() -> str:
    """List all existing tags in the system."""
    conn = sqlite3.connect("personal_crm.db")
    c = conn.cursor()

    c.execute("""
        SELECT name, COUNT(ct.contact_id) as usage_count
        FROM tags t
        LEFT JOIN contact_tags ct ON t.id = ct.tag_id
        GROUP BY t.id, t.name
        ORDER BY usage_count DESC, name
    """)

    results = c.fetchall()
    conn.close()

    if not results:
        return "No tags found in the system"

    tags = "\n".join([f"• {row[0]} ({row[1]} contacts)" for row in results])

    return f"All tags:\n\n{tags}"
Adding and managing notes
Notes are essential for keeping track of important information related to each contact. We have several functions to manage notes:
- Adding Notes: The
add_notefunction allows users to add notes to existing contacts.
Here is the code for the add_note function:
@mcp.tool()
async def add_note(contact_name: str, note: str) -> str:
    """Add a note to an existing contact.

    Args:
        contact_name: Name of the contact
        note: Note text to add
    """
    conn = sqlite3.connect("personal_crm.db")
    c = conn.cursor()

    # Get contact ID
    c.execute("SELECT id FROM contacts WHERE name LIKE ?", (f"%{contact_name}%",))
    result = c.fetchone()

    if not result:
        conn.close()
        return f"Contact {contact_name} not found"

    contact_id = result[0]

    # Add note
    c.execute(
        "INSERT INTO contact_notes (contact_id, note_text) VALUES (?, ?)",
        (contact_id, note),
    )

    conn.commit()
    conn.close()

return f"Note added successfully for {contact_name}"- Listing Notes: The
list_contact_notesfunction retrieves all notes associated with a specific contact, providing a clear view of the contact’s history.
Here is the code for the list_contact_notes function:
@mcp.tool()
async def list_contact_notes(contact_name: str) -> str:
    """List all notes for a contact with their IDs.

    Args:
        contact_name: Name of the contact
    """
    conn = sqlite3.connect("personal_crm.db")
    c = conn.cursor()

    c.execute(
        """
        SELECT cn.id, cn.note_text, cn.created_at
        FROM contact_notes cn
        JOIN contacts c ON c.id = cn.contact_id
        WHERE c.name LIKE ?
        ORDER BY cn.created_at DESC
    """,
        (f"%{contact_name}%",),
    )

    results = c.fetchall()
    conn.close()

    if not results:
        return f"No notes found for contact {contact_name}"

    notes = "\n\n".join(
        [f"Note ID: {row[0]}\nCreated: {row[2]}\nText: {row[1]}" for row in results]
    )

return f"Notes for {contact_name}:\n\n{notes}"- Editing Notes: The
edit_note_by_idfunction allows users to update existing notes using their IDs.
Here is the code for the edit_note_by_id function:
@mcp.tool()
async def edit_note_by_id(note_id: int, new_note: str) -> str:
    """Edit a note using its ID.

    Args:
        note_id: ID of the note to edit
        new_note: New text for the note
    """
    conn = sqlite3.connect("personal_crm.db")
    c = conn.cursor()

    c.execute(
        "UPDATE contact_notes SET note_text = ? WHERE id = ?", (new_note, note_id)
    )

    if c.rowcount == 0:
        conn.close()
        return f"Note with ID {note_id} not found"

    conn.commit()
    conn.close()

    return "Note updated successfully"
These functionalities form the backbone of our CRM, enabling users to effectively manage their contacts and associated information.
Running the CRM
To run the CRM, you need to start the FastMCP server that we have set up. This server will allow you to interact with the CRM functionalities through the MCP protocol.
You can run the server by executing the following code:
if __name__ == "__main__":
    mcp.run(transport="stdio")
After the server is running, you can use the MCP tools to add contacts, search for them, manage tags, and add or edit notes. Make sure to follow the instructions provided in the respective sections to utilize the CRM effectively.
Conclusion
In this article, we explored the development of a simple CRM using the Model Context Protocol (MCP). We began by understanding the significance of MCP in standardizing connections between AI systems and data sources, which simplifies the integration process. The CRM we built serves as a practical tool for maintaining relationships with friends and industry contacts, while also providing a hands-on learning experience with MCP.
We successfully set up the FastMCP server and designed a robust SQLite database structure that includes tables for contacts, tags, and notes. The functionalities we implemented, such as adding contacts, searching for them, managing tags, and handling notes, demonstrate the versatility of the MCP in creating useful applications.
Looking ahead, there are numerous potential enhancements we could consider for this CRM. Features like advanced search filters, integration with external APIs, or even a user interface could significantly improve user experience. We encourage readers to explore MCP further and consider how they might apply it in their own projects, as the possibilities are vast.
By leveraging MCP, we not only built a functional CRM but also gained insights into the future of AI applications and their integration with various data sources. We hope this article inspires you to dive deeper into MCP and its capabilities.